Standard Operating Procedure
Warehousing Inventory Auditing
Warehousing · All Nellis Auction Locations
| Document ID | SOP_Operations_Inventory Auditing_5/27/2026_V1 |
| Version | 1.0 |
| Effective Date | 5/27/2026 |
| Process Owner | Warehousing Area Manager |
| Department | Warehousing |
| Facility | All Nellis Auction Locations |
Purpose
To establish a standardized process for auditing rack inventory using the Rack Audit Tool to ensure all items are accurately reflected in the system and physically located in the correct rack positions.
This process identifies and resolves inventory defects such as items not put away, not processed, incorrectly located, or improperly disposed of. Defective items are removed from racks and routed to the appropriate areas (No Sale, Reprocessing, Stash, or Garbage) to maintain accurate inventory and efficient rack utilization.
By maintaining clean and accurate racks, this process supports improved operational flow, increased revenue, and a better customer experience.
Scope & Audience
Scope
This SOP applies to all Nellis Auction warehouse locations that utilize rack storage and conduct inventory audits using the Rack Audit Tool.
It covers all activities related to auditing rack inventory, including:
- Scanning and verifying items within rack locations
- Identifying and correcting inventory discrepancies
- Removing and properly routing defective items
- Utilizing the audit cart and designated bins for item separation
- Completing rack audits and initiating subsequent audits
This SOP applies to all rack audit scenarios, regardless of product type, and is to be followed during all operational periods in which rack auditing is performed.
Audience
This SOP must be read, understood, and followed by all team members involved in rack auditing operations, including:
- Warehouse Team Members (Auditors)
- Area Managers
- Operations Managers
These roles are responsible for executing, overseeing, or reviewing rack audit activities and ensuring adherence to the process outlined in this SOP.
Roles & Responsibilities
| Role | Responsibility | Description |
|---|---|---|
| Warehouse AM | Assignment Oversight Review |
AM will identify which aisles, bays, or rack locations need to be audited based on defect trends, missed audits, or time since last audit. AM will assign warehouse team members to perform rack audits and ensure coverage across the building. AM will monitor audit execution and ensure audits are being completed thoroughly, including proper scanning, defect removal, and routing of items. AM will review audit results to identify gaps such as items not put away, defects left in racks, or high defect areas, and provide coaching as needed. |
| Warehouse Team Member | Preparation Auditing Clean Up |
The auditor will gather required equipment, including scanner, laptop, and audit cart with properly arranged bins (Blue, Red, Yellow, Green). Auditors will receive assigned aisles, bays, or rack locations from the AM prior to beginning audits. Auditors will perform rack audits using the Rack Audit Tool by scanning all items, correcting items in place when applicable, and removing defective items into the correct bins. Auditors will resolve missing item prompts by searching the surrounding area, scanning items into correct locations if found, or marking items as missing if not located. Once audits are complete, all items must be routed correctly: No Sale to processing, Stash to returns, Reprocessing to processing, and Garbage to manager for approval before disposal. The auditor will ensure all bins are emptied, cart is cleared, and equipment is returned to its designated 5S location. |
Definitions & Key Terms
| Term | Definition |
|---|---|
| Cargo | Nellis Auction’s operating system used to manage inventory and access tools. |
| Parcel (Retool) | Web-based platforms accessed through Cargo used to operate internal tools, including Rack Audits. |
| Rack Audit Tool | The system used to perform rack audits, scan items, and identify inventory discrepancies. |
| Rack Audit | Process of verifying that items physically in rack locations match system records using the Rack Audit Tool. |
| Defect | Any mismatch between an item’s physical state and its system status (e.g., wrong location, not processed, or incorrect disposition). |
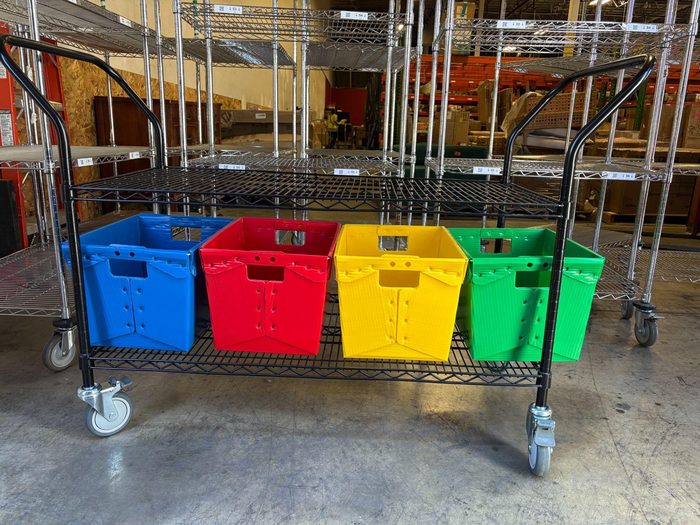
| Audit Cart | Mobile wire cart used during audits, equipped with color-coded bins for sorting defective items. |
| No Sale Tote (Blue) | Holds items marked removed or trashed in the system but physically present; routed to processing. |
| Garbage Tote (Red) | Holds damaged or unsellable items; requires manager approval before disposal. |
| Stash Tote (Yellow) | Holds items marked as picked up but still physically present; routed to returns. |
| Reprocessing Tote (Green) | Holds sellable items missing labels, packaging, or not processed; routed to processing. |
| Missing Item Prompt | System prompt requiring the auditor to locate an item or mark it as missing during audit. |
| Missing Item Bin | A designated physical bin on the Audit Cart used to hold items that cannot be located during an audit. When an item is marked as missing in the system during Step 6, it is assigned to this bin for follow-up resolution. |
| 5S location | A standardized, labeled storage location in the warehouse organized according to 5S workplace principles (Sort, Set in Order, Shine, Standardize, Sustain). Equipment must be returned to its assigned 5S location at the end of each audit to ensure availability for the next shift. |
| Ring Indicator | A circular progress icon displayed in the Rack Audit Tool representing the scan completion status of a rack location. The ring fills progressively as items are scanned. A fully filled green ring indicates all items in that rack have been accounted for. An incomplete ring signals that one or more items still require resolution. |
Required Supplies & PPE
| Equipment / Supply | Supplier / Item Number | Photo / Reference |
|---|---|---|
| Laptop or iPad | Nellis Auction Supplied |   |
| Finger Scanner or Zebra Scanner | Zebra technologies or Amazon | 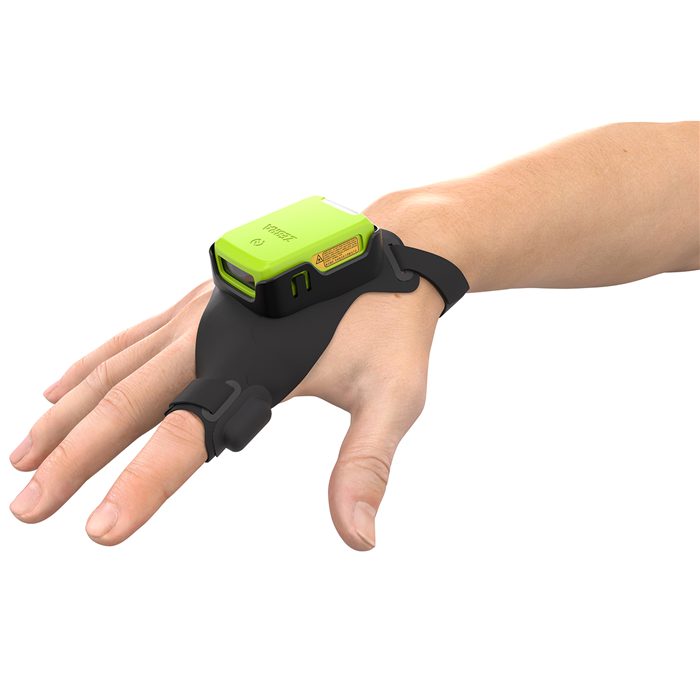 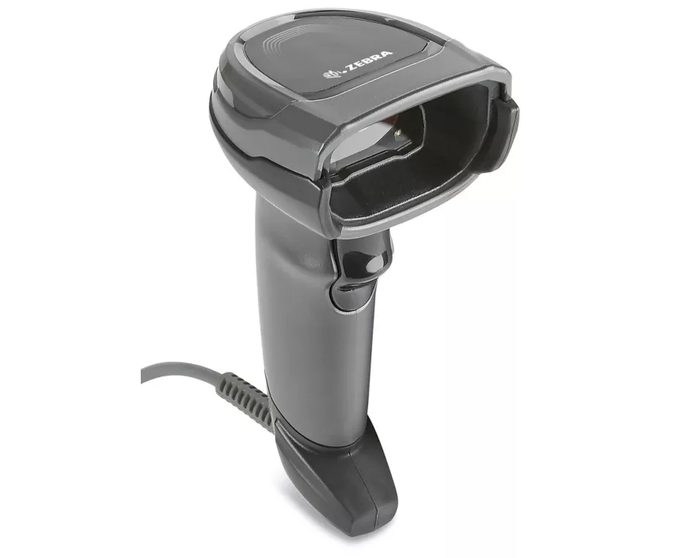 |
| Black Wired Cart | ULINE – H-6788 | 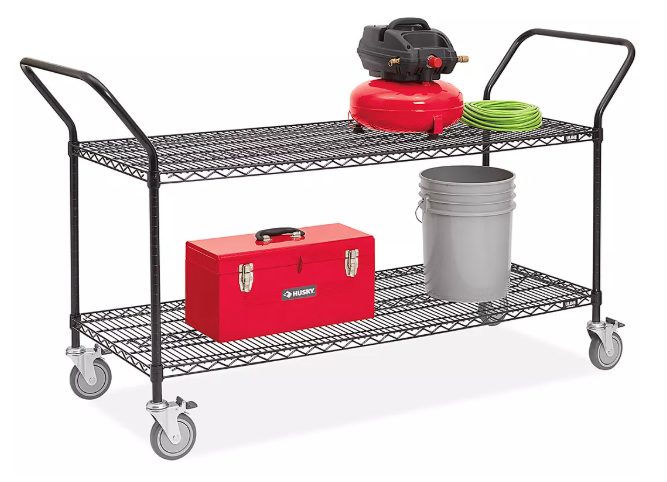 |
| Space Bins (Blue, Red, Yellow, Green) | ULINE – S-133BL | 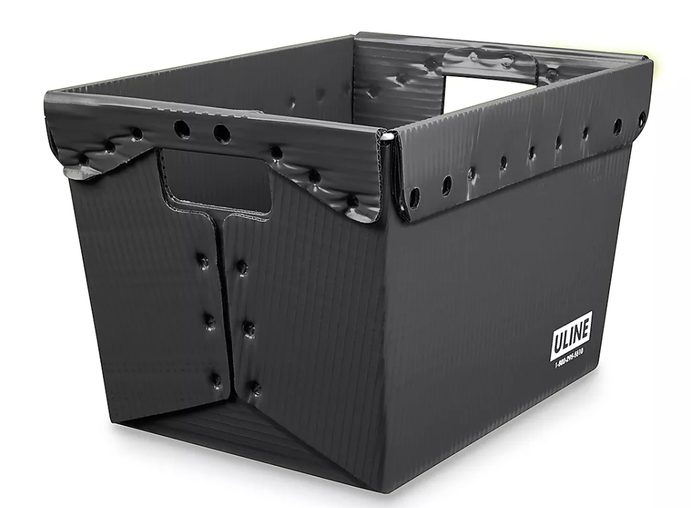 |
| Clean Empty Tote | Nellis Auction Supplied | 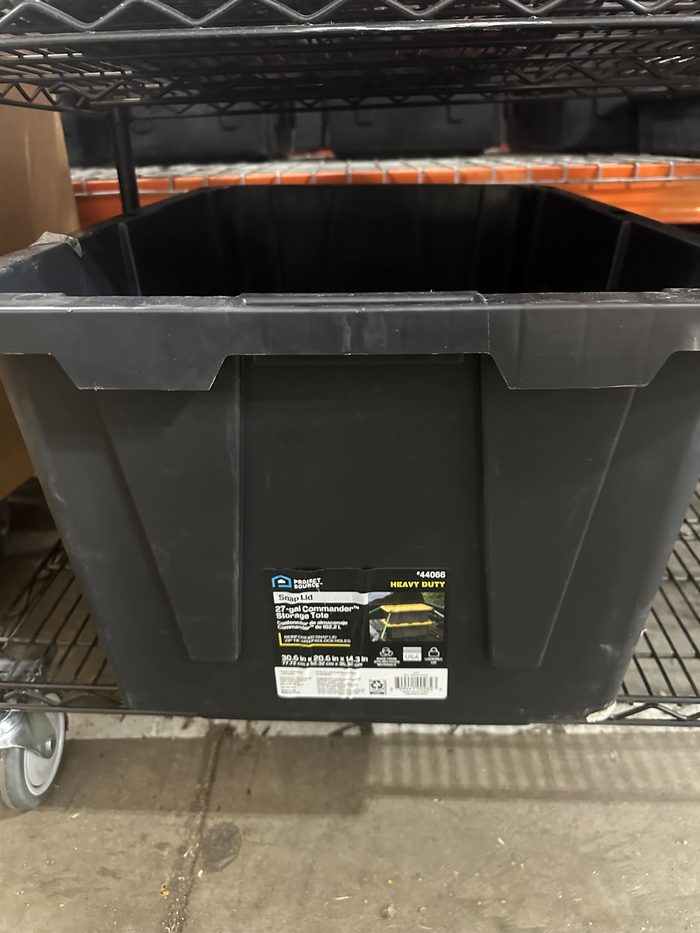 |
| Polybags | S- 1340 S- 1353 S- 1357 |
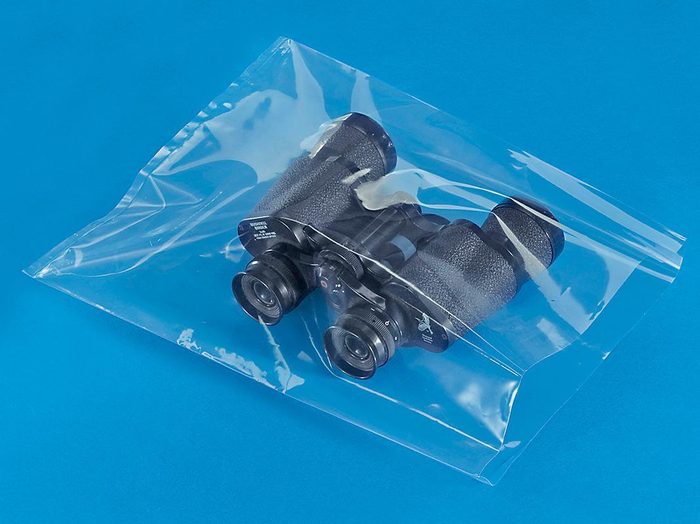 |
| Tape Gun | H- 596 | 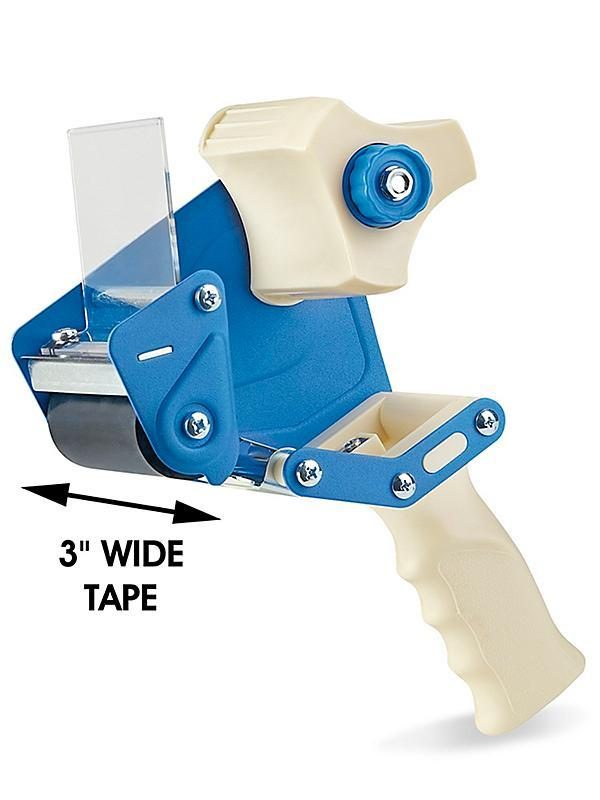 |
Procedures
BIN Audit Process
To define the step-by-step process for conducting bin-level rack audits using the Rack Audit Tool. This document supplements SOP_Operations_Inventory Auditing_5/27/2026_V1 and applies specifically to bin or rack storage locations. The process ensures each bin is physically emptied, every item is scanned and verified against the system record, and any defective items are routed to the correct destination.
| Bin Name | Color | Defect Type | Routes To |
|---|---|---|---|
| No Sale | Blue | Marked removed or trashed in system but physically present | Nellis Variety Box Construction |
| Garbage | Red | Damaged or unsellable (requires manager approval before disposal) | Processing Manager / Disposal |
| Stash | Yellow | Marked picked up in system, but still physically present | Customer Experience Manager / Stash |
| Reprocessing | Green | Not processed or missing label/packaging | Processing Manager / Reprocessed |
Cart Setup & Preparation
Set up your audit cart before beginning any rack audit.
Locate a mobile wire cart and place the four designated space bins on the bottom level in the following order from left to right: Blue (No Sale), Red (Garbage), Yellow (Stash), and Green (Reprocessing). Ensure all required tools are present, including a laptop or iPad, scanner (finger or Zebra), polybags, and tape gun.
Assignments are communicated by your Area Manager at the start of the shift. Assignments may be given verbally, via a daily task sheet, or through the whiteboard in the warehouse. If you have not received an assignment, check with your AM before proceeding.
Proceed to your assigned rack locations.
Access Rack Audit Tool
Log in to the system and navigate to the Rack Audit Tool.
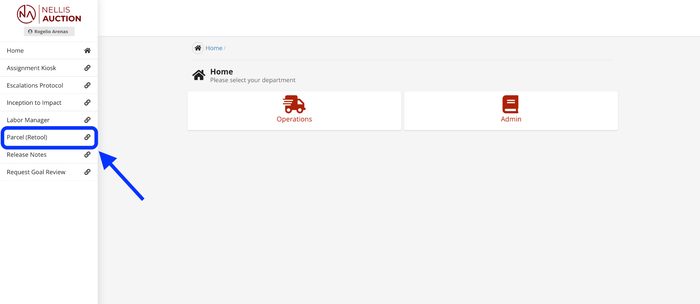
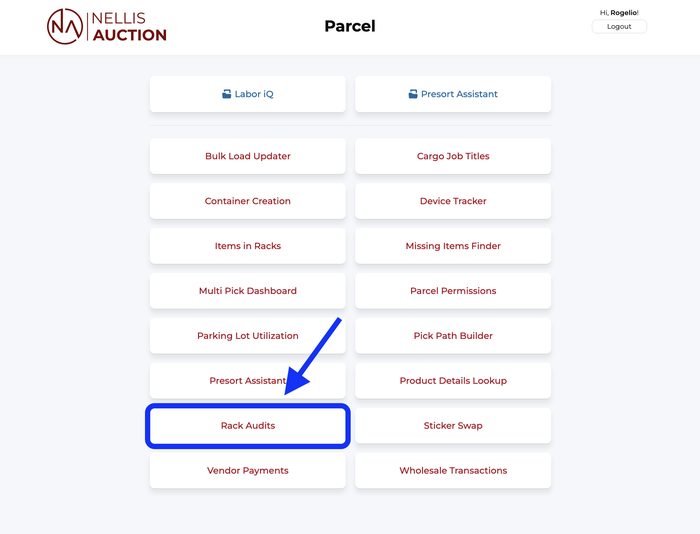
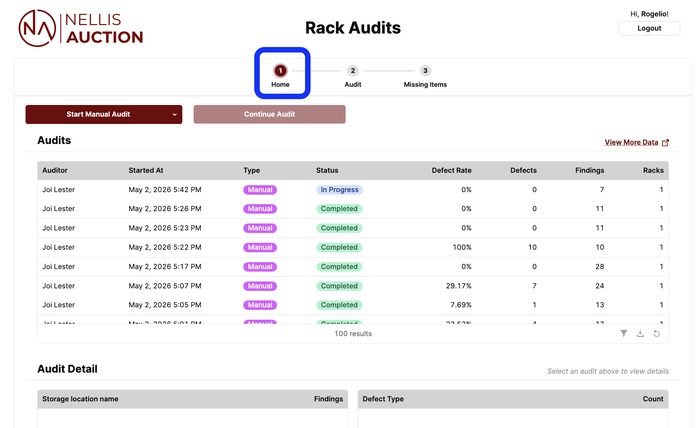
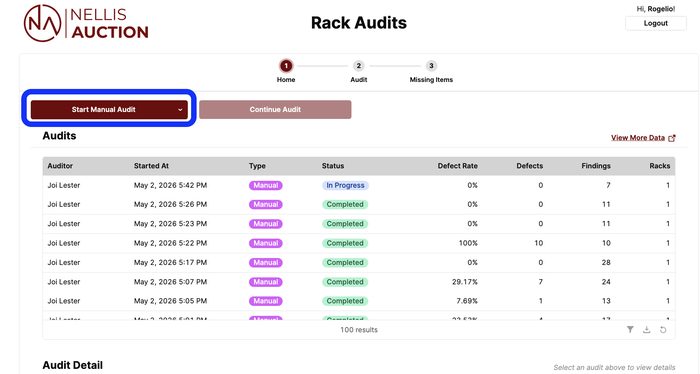
Log in to Cargo, open the menu, and navigate to Parcel (Retool). From there, select Rack Audits and confirm you are on the home screen indicated by a number 1 highlighted in red.
Start Audit & Scan Rack Locations
To begin, select “Start Manual Audit” and enter the audit interface.
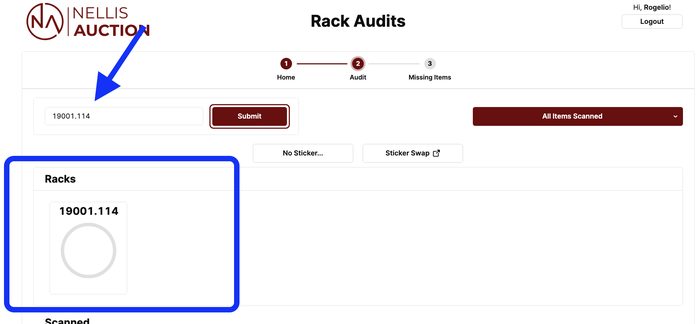
Initialize your audit by scanning rack locations.
IMPORTANT — How to Scan Correctly:
The Rack Audit Tool was designed to audit in a specific way. Scanning incorrectly will cause defects to go undetected. Follow the guidance below based on your location type:
Shelf Locations: Scan all storage locations on a single level within a single bay. Do NOT scan a full bay of multiple levels at once. If an item is virtually assigned to Level 2 but physically sitting on Level 4, scanning the full bay will not flag it as a defect.
Bin Locations: Scan the storage location label on the rack first, then scan the bin that resides in that location.. Do NOT scan a full level of bins at once. If an item is in the wrong bin and you scanned the entire level together, the system will not flag it as a defect.
Audit Items Within Rack
Scan and verify each item within the previously scanned rack and/or BIN.
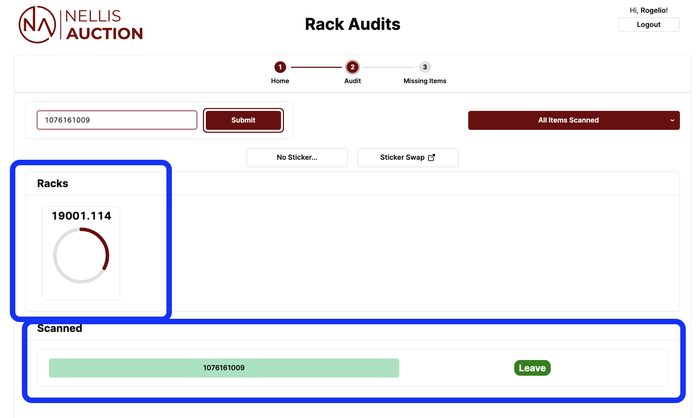
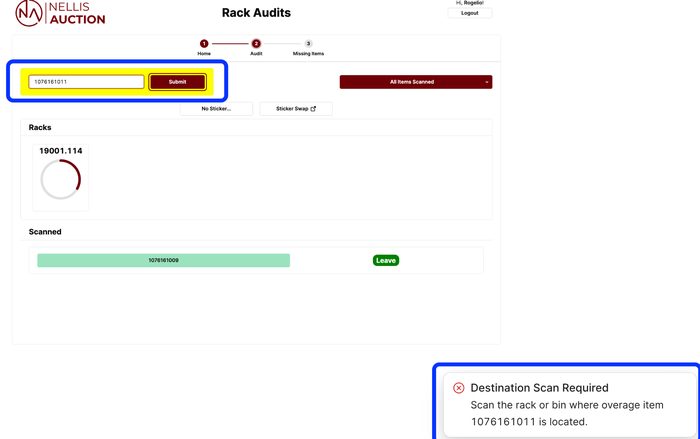
Follow the same directional flow used when scanning rack locations. Scan each item individually. A successful scan confirms the item is correctly located via an audible ding, with the inventory number appearing below highlighted in the color of the item's sticker, and the word "Leave" displayed next to it. If an error occurs, the item requires correction or removal.
Correct items in place when applicable, such as scanning items into the correct location or assigning processed items that were not put away. The system will indicate and announce the actions needed to be taken in the bottom right corner.
Successful scan:
Unsuccessful scan:
Handle Defective Items Using the Physical Audit Cart
Remove and sort defective items into the correct bins according to their labeled disposition type.
Items that cannot be corrected in place must be removed and placed into the appropriate cart bin:
- Blue (No Sale): Items marked removed/trashed in system but physically present
- Red (Garbage): Damaged or unsellable items (requires manager approval before disposal)
- Yellow (Stash): Items marked picked up but still present
- Green (Reprocessing): Items not processed or missing label/packaging
Use polybags or a tape gun to secure items as needed before placing them into bins.
Complete Rack & Resolve Missing Items
Ensure the rack is fully completed and all discrepancies are resolved.
After scanning all items in a rack, review the ring indicator. A fully completed rack will show as a fully filled green ring.
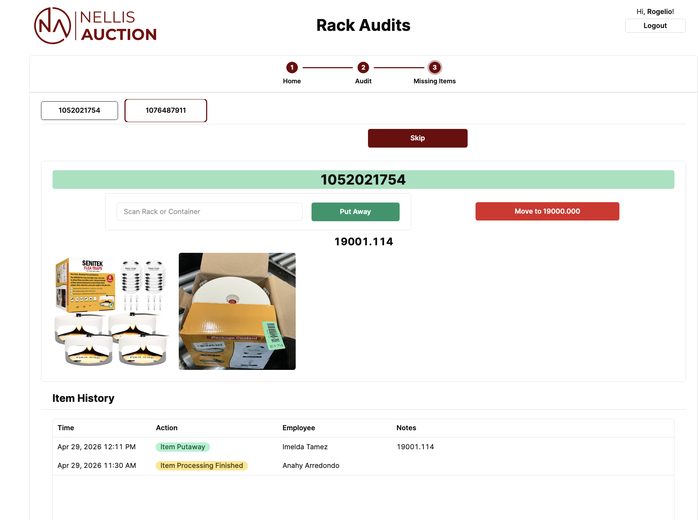
If the ring is not complete, the system will prompt you to locate a missing item. The prompt will include an image, inventory number, and tag color. Search the surrounding area for the item.
Allocate 2-5 minutes to search for each missing item based on a price-driven cost/benefit judgement call before marking it as missing. This benchmark ensures consistent audit pace and aligns with the standard set in other Nellis SOPs. We want to be sure we are using our time valuably during this process. Some items in inventory may not be worth investing significant time to research. However, on a case by case basis, if an item meets a high dollar threshold it may be worth spending the extra time to locate.
- If found: scan the item into its current location.
- If not found within a few minutes: mark the item as missing in the system.
- Continue until the rack is fully completed.
Missing items page:
Complete Audit
Finalize the audit once all racks are completed.
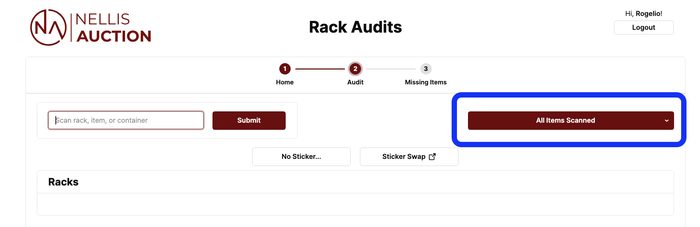
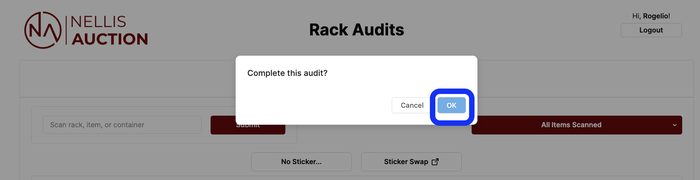
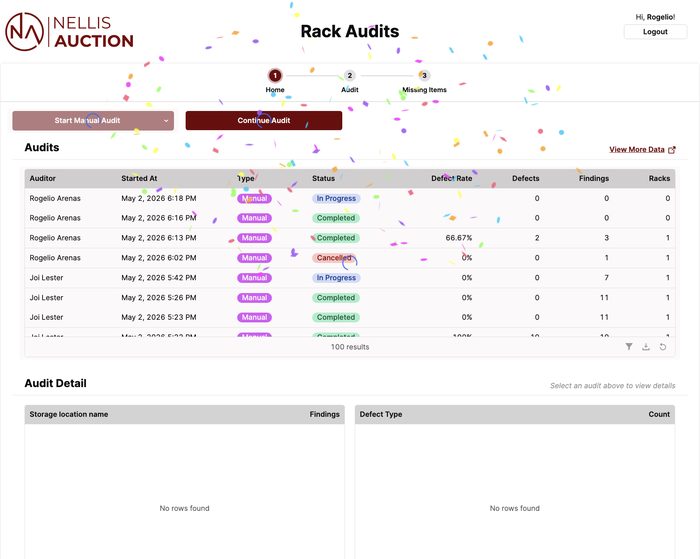
After all rack locations have been fully audited, select “All Items Scanned,” then confirm by selecting “Complete This Audit” and OK. A confirmation will appear indicating the audit is complete.
Proceed to the next assigned audit if applicable.
⚠ CAUTION: Completing an audit is a final action. Before selecting "Complete This Audit," ensure all Ring Indicators are fully filled green. If any items were not scanned, the system will automatically route them to the Missing Item Bin and prompt you to identify each one — showing the item picture, inventory number, and last known location. At that point you have two options:
- Option A — If you can locate the item using the provided context: scan it into its current location. This will fill the ring and allow the audit to be completed.
- Option B — If the item cannot be located: mark it as missing and it will be assigned to the Missing Item Bin, filling the ring so the audit can be completed.
If an audit is closed prematurely for any reason, do not leave it as-is. Re-audit that rack to ensure a clean audit is completed and all items are trued up in the system.
Route Items & Clean Up
Properly route all items and reset your equipment.
Deliver items from each bin to their appropriate destination once the various disposition bins are filled up or at a natural break in your day (lunch time, break time, or end of shift)::
- No Sale (Blue) → Processing / Mystery Box area
- Stash (Yellow) → Returns
- Reprocessing (Green) → Processing line
- Garbage (Red) → Manager approval → Trash
Manager Approval Process for Garbage: Before disposing of any items in the Red (Garbage) bin, locate your Area Manager. Show the manager the items for review. The manager will confirm each item is unsellable and authorize disposal. Do not dispose of any items without verbal or written approval from a manager. If the AM is unavailable, hold the items on the cart and notify the manager as soon as possible.
Ensure all bins are emptied, no items remain on the cart, and return all equipment to its designated 5S location.
Continue Auditing
Repeat the process for all assigned rack locations.
Continue Steps 3–8 until all assigned audits are completed.
Start a Manual Audit in the Rack Audit Tool
Log in to Cargo, navigate to Parcel (Retool), and open Rack Audits. Select Start Manual Audit.
Approach your first assigned bin location on the rack.
Scan the storage location label on the rack.
This is the barcode on the rack slot itself; the location the bin is currently sitting in. Scan one bin location at a time. Do not scan an entire level of locations together; doing so will prevent defects from being flagged correctly.
Scan the BIN
Scan the BIN barcode into the Rack Audit Tool.
Remove the bin from the rack and place it on top of your audit cart.
Remove the bin from the rack and place it on top of your audit cart and prepare to conduct your audit.
Empty the contents of the bin into your temporary tray.
Dump the contents or transfer items by hand; either method is acceptable. Remove any debris from the bin so it is clean and empty before you begin scanning. Take care to ensure you do not damage items or drop them onto the ground.
Remove one item from the tray and scan it into the Rack Audit Tool.
Successful scan (audible ding, item shows "Leave") - Place the item back into the bin being audited.
Unsuccessful scan (error, no ding, or action prompt displayed) - Place the item in the appropriate colored bin at the bottom of your cart. See the Defect Bin Reference section below.
Repeat Step 7 for each item in the tray until the tray is empty.
Every item must be scanned and placed in either the audited bin or a defect bin. Do not leave items unscanned in the tray.
Resolve any missing item prompts.
If the system prompts you for a missing item, search the surrounding area for up to 2 minutes. If found, scan it into its current location. If not found within 2 minutes, mark it as missing in the system.
Confirm the ring indicator is fully green, then mark the audit complete.
Select “All Items Scanned,” then “Complete This Audit,” and “OK.” Refer to Step 7 of the main Rack Audit SOP for full guidance on completion.
Physically return the bin to its previous rack location.
Return the BIN to the original rack location, where you first found it. Ensure the BIN label is visible to the walk aisle.
Move to your next assigned bin and repeat from Step 2.
PRO TIP: Always complete the full bay you are auditing before ending your shift or audit process. Stopping mid-bay poses a risk of missed bins or unnecessary repetition.
Items that cannot be corrected in place are removed from the tray and placed into the appropriate cart bin. Use the table below to determine the correct bin for each defect type.
Process Flow Diagram
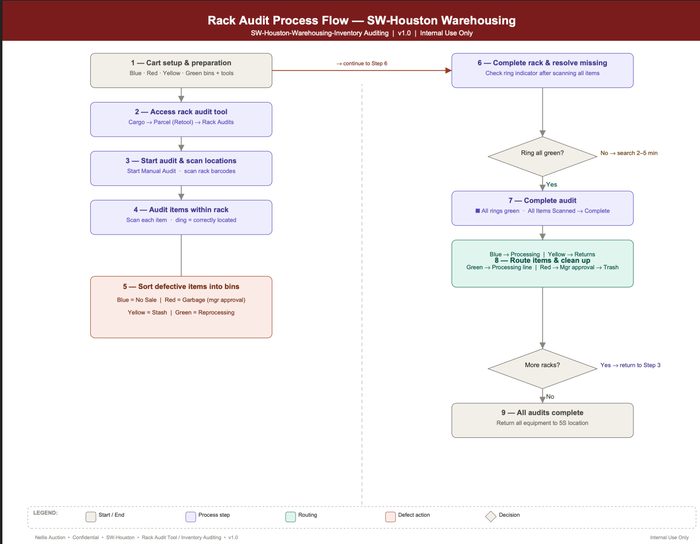
The following diagram provides a visual overview of the end-to-end process flow. Refer to the Procedures section for detailed step-by-step instructions.
The Nellis Standard
The following standards are extracted from this SOP and represent the key observable, auditable behaviors and outcomes that define excellence in this process. These standards feed into the Nellis Auction master audit framework.
Accurate inventory is the foundation of an efficient warehouse and a great customer experience. While we strive to get inventory right upstream, every rack audit performed improves & protects Nellis Auction's revenue, earnings, reputation, and ability to serve our customers at the highest level.
Quantifiable Metrics
Budgeted Hours - Facilities are initially budgeted to have 1 full time inventory auditor, 7 days/week (or approximately 76 manhours) . However, if defect rates exceed 15%, buildings are pre-approved (with Regional Director alignment) to increase audit staffing by 1 FTE temporarily until defect rates drop below 15% (< Subject to change). If Defect rates exceed 25%, a 3rd FTE is warranted, but a full root cause analysis and action plan is also required, in partnership with the RDO to bring defect rates and auditor labor spend back within tolerance.
Productivity / UPH - Although Inventory Auditing is not currently treated as a direct assignment and therefore an official rate of productivity is not established, we seek to achieve an audit UPH of approximately 500 units/hour per auditor (this equates to 1 A12 elevation bay per hour). Additionally there should be consistent output from the auditor each day of the week, indicating that consistent audit effort is happening.
Gap Time – The amount of time, measured in minutes, but typically reported as a % of total time where an employee was not in an active state performing direct work. Although there are acceptable levels of gap time expected for all employees, the goal is generally to minimize this as much as possible. Goal: <= 10% (example: 10% x 570 mins = ~ 57 mins). Because Inventory Auditors are currently classified as Indirect roles, gap time should remain characteristically low.
Observational Metrics
Evident Dispositions - Active audit carts should show signs of defects being dispositioned.
Evident Inventory Improvement - Racks and BINS that have just been audited should show obvious signs of intervention; improved organization, reduced trash/debris, better adherence to putaway etiquette, etc.
The proper company-approved cart, as outlined in this SOP is used to execute audits, enabling maximum auditor efficiency. Adhoc or personalized carts are not permitted.
Auditors perform the correct audit methods based on the location they are auditing. Shelf locations are scanned level-by-level and bin locations are scanned one BIN at a time.
Auditors perform their audits in a consistent left-to-right or right-to-left directional flow.
Auditors accurately & consistently disposition inventory to the appropriate bin based on their audit findings.
Auditors invest approximately 2 minutes into researching missing items, more if the item is of higher retail value (a good starting point is >$100)..
Auditors confirm that all audits are complete (fully filled green ring indicator for all locations) before selecting “Complete this Audit.”
Auditor equipment is always returned to its designated 5S location and cleared of trash/debris when not in use. The cart should be fully ready for use at all times.
Auditors attempt to resolve any inventory quality/integrity issues prior to moving on, and when they are unable to resolve perceived issues (damage, insufficient packaging, etc.), they escalate to a Manager at their earliest convenience. Auditors exude a high degree of buy-in and demonstrate a strong desire to rightsize inventory, regardless of the issue(s) encountered.
Common Exceptions
| Exception / Scenario | Resolution | Reference / Escalation |
|---|---|---|
| Rack Audit Tool unavailable / Parcel (Retool) not loading | Log out of Cargo and log back in. Refresh the browser. If the issue persists, notify your AM and do not begin auditing until the tool is confirmed working. | IT Support / AM |
| Item found in wrong location but system shows it as correct | Scan the item into its actual physical location to update the system record. If the system will not accept the correction, flag the item and notify your AM. | AM |
| Item barcode damaged or unreadable | Place the item in the Reprocessing (Green) bin for re-labeling. Note the location the item was found and inform your AM. | AM |
| Garbage bin full before audit is complete | Pause and seek manager approval to dispose of current Garbage bin contents before continuing. Return the empty bin to the cart and resume. | AM Step 8. |
| AM unavailable to approve Garbage disposal | Do not dispose of items. Hold the full bin on the cart or in a designated holding area. Notify the AM as soon as they are available. | Step 8 |
| Cart not available at start of shift | Report to your AM immediately. Do not begin auditing without a properly equipped cart. AM will locate or arrange an alternate cart. | AM |
| Audit completed prematurely (before all rings are green) | Re-audit the affected rack to ensure a clean audit is completed and all items are trued up. The system will prompt you to identify any unscanned items via the missing item flow before the audit can be closed. Notify your AM so they are aware. | AM / Step 7 |
| Scanner not connecting or malfunctioning | Attempt to re-pair or replace batteries. Swap for an alternate scanner if available. If no scanner is available, notify AM — do not attempt to audit without a working scanner. | AM / Equipment |
| Temporary tray not available at start of shift | Report to your AM. Do not begin bin auditing without a tray or suitable holding surface. AM will locate or arrange an alternative. | AM |
| Bin contents too large to empty into tray | Transfer items by hand rather than dumping. If items are oversized and cannot be practically moved, notify your AM before proceeding. | AM |
| Item scanned from tray but system cannot match it to the location | Follow the on-screen action prompt. Attempt to correct in place by scanning the item into its correct location. If the system will not accept the correction, flag the item and notify your AM. | AM |
Supporting Job Aids & Forms
| Document Name | Description | Link / Location |
|---|---|---|
| [Document Name] | [Brief description of the document] | [URL or file path] |
Training & Certification
| Training Requirement | Audience | Frequency | Delivered By |
|---|---|---|---|
| [Initial Onboarding Training] | [New Hires] | [Day 1] | [Certified Trainer] |
| [Recertification / Refresher] | [All Team Members] | [Quarterly] | [Area Manager] |
Certification Requirements
Quality Control & Auditing
Audit Schedule
| Audit Type | Frequency | Performed By | Documentation |
|---|---|---|---|
| [Spot Check] | [Daily] | [Area Manager] | [Audit Log / Form] |
| [Formal Audit] | [Monthly] | [Ops Manager] | [Audit Report Template] |
Non-Conformance Handling
All deviations from this SOP will be addressed using a progressive accountability process to ensure compliance and continuous improvement.
Process Steps:
- Journal Acknowledgement
- Initial documentation of the issue.
- Team members acknowledge the expectation and correct process.
- Coaching 1
- First formal coaching conversation.
- Focus on reinforcing correct procedures and expectations.
- Coaching 2
- Second coaching session if behavior continues.
- Additional guidance and clarification provided.
- Corrective Action 1
- Formal corrective action issued.
- Documented performance concern with clear expectations for improvement.
- Corrective Action 2
- Escalated corrective action for repeated non-compliance.
- Corrective Action 3
- Final level of corrective action.
- May result in further disciplinary action up to and including termination.
Expectation:
All team members are expected to follow SOP procedures at all times. Failure to comply will result in progression through the steps outlined above.
Safety & Compliance
Safety Requirements
Personal Protective Equipment (PPE)
While rack auditing is a low-risk activity, the following PPE is required at all times on the warehouse floor:
- Closed-toe shoes — Required. No sandals, flip-flops, or open-toe footwear permitted in the warehouse at any time.
- High-visibility vest — Required when working in or near active forklift or pallet jack zones.
- Gloves — Recommended when handling damaged, broken, or sharp-edged items encountered during auditing.
Warehouse Floor Safety
- Always be aware of forklift and pallet jack traffic when moving your audit cart through aisles. Yield to all powered industrial equipment.
- Do not leave your audit cart unattended in the middle of an aisle. Park it flush against a rack when stepping away.
- Never climb rack shelving to retrieve or inspect items. If an item is out of reach, notify your Area Manager.
- Keep aisles clear — do not stack removed items on the floor. All defective items must go directly into the designated bins on the audit cart.
- Walk at all times on the warehouse floor. Do not run.
Ergonomics & Manual Handling
- When scanning lower rack levels, squat or kneel rather than bending at the waist to reduce back strain.
- Do not attempt to move or reposition heavy items alone. Request assistance or use appropriate equipment.
- Take breaks as needed — prolonged repetitive scanning can cause hand and wrist fatigue.
Electrical & Equipment Safety
- Ensure your laptop or iPad is fully charged before beginning a shift. Do not use damaged or frayed charging cables.
- Inspect finger scanners and Zebra scanners before use. Do not use a scanner with a cracked housing or exposed wiring — report it to your AM immediately.
- Do not obstruct emergency exits, fire extinguishers, or safety equipment with your audit cart at any time.
Incident Reporting
All safety incidents, near-misses, and hazardous conditions must be reported immediately to ensure a safe work environment and proper documentation.
What to Report:
- Work-related injuries and illnesses
- Near-misses (events that could have caused injury or damage)
- Unsafe conditions (equipment issues, hazards, weather-related risks)
- Vehicle-related incidents in the parking lot
Reporting Process:
- Notify a Manager Immediately
- Report the incident to the Area Manager or supervisor as soon as it occurs.
- Do not delay reporting, even for minor incidents.
- Ensure Safety First
- Stop work if necessary.
- Move to a safe location.
- Assist any injured individual if it is safe to do so.
- Seek Medical Attention (if needed)
- For injuries, request first aid or medical assistance by contacting the Nurse Hotline.
- Call emergency services (911) for serious situations.
- Document the Incident
- Complete The Safety Hub report form with accurate details.
- Include time, location, individuals involved, and a detailed description of what occurred.
- Manager Documentation & Escalation
- The Manager will log the incident according to company policy.
- Injuries/Illnesses: Management to complete Slack notification for awareness. If the incident results in a medical visit, complete the Injury and Illness Incident Report (IIIR).
- Escalate to upper management, EHS or HR, if required.
- Follow-Up
- Follow all corrective actions or safety recommendations provided.
- Utilize the Incident Investigation Form to conduct a thorough investigation if requested.
Expectation:
Non-compliance with incident or hazard reporting protocols may lead to formal disciplinary measures. Timely notification is essential to mitigate operational risks and maintain a secure environment for all personnel.